Adding Fees in the Financial Table
We highly
recommend that you add all fees via the financial table prior to creating any
activity or facility registrations. This will simplify the process of defining
new activities and facilities. Fees are
typically add-on items to activity, reservation or membership pricing. The following are some examples of fees: team jersey, room cleaning, alcohol service,
AV equipment, towel service, facility improvement, table and chair set up, camp
registration cancellation just to name a few.
In addition, Sportsman can accommodate ‘convenience fees’ as a dollar
amount or percentage of sale add-on to online registrations and reservations –
those are built into the system and not needed to be set up in tables but are
established in your Sportsman Site Configuration. If at any time you find yourself in
need of additional support, please contact our Technical Consultants at support@peakinfo.com or 801-572-3570 x2.
Prerequisites: You must have
permissions to Define Activities for Registration, List Management and
Financial List Management offered by a
Sportsman System Administrator.
This Document will go over:
ü
Adding Fees
ü
Editing Fees
Adding Fees
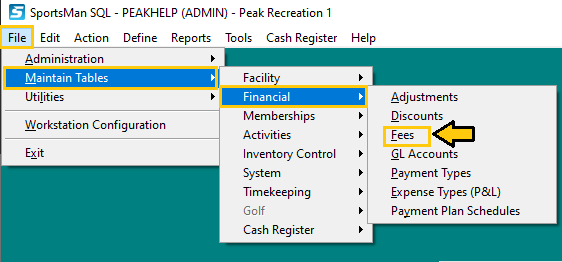
To begin, navigate to File>Maintain Tables>Financial>Fees
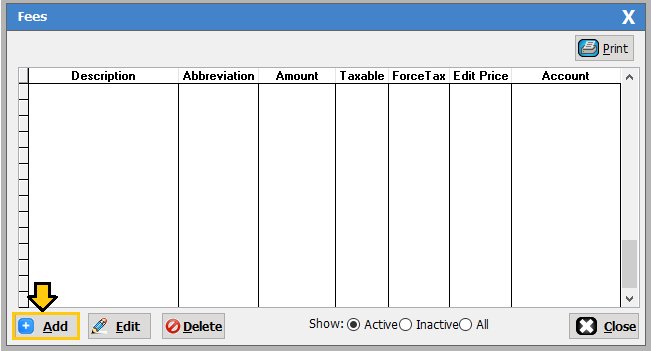
Click, [add] in the lower left corner of the
pop-up box.
Next, complete the following information as needed to define your fee:
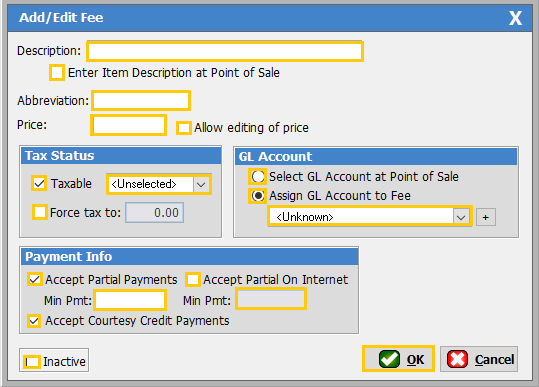
Description: The name of the fee
Enter
Item Description at Point of Sale: Checking this box would allow you to set up a
generic $10 fee that you further define at the point of sale as a
‘T-shirt’.
Abbreviation: This is a shorter code that will show in
reporting and must be unique among ALL fees defined in Sportsman, those created
inside tables and those created in activity or reservation questions. Sportsman
will not allow fees with identical abbreviations to be created.
Price: The price of
the fee
Allow
Editing of Price: This will allow
your staff to change the price of the fee once it is is added to the cash
register.
Taxable: Select
the tax rate that will apply to this fee if applicable
Force
Tax To:
If the fee is Taxable you could force the tax to a certain minimum
percentage.
Select
GL Account at Point of Sale: if you want to have a more general fee that
can be assigned to a choice of GL acocunts depending on its use
Assign
GL Account to Fee: use the drop down selector to associate a
pre-defined GL with this fee or click the [+] sign to add a new
GL account. To learn how to add a GL accuont, see the Adding GL Accounts in the
Finaical tables document.
Accept
Partial Payment: allows the fee to
be split with partial payments and allows for a Minimum Payment amount
Accept
Partial on Internet: allows the fee to be split with partial
payments when patrons pay the fee online, this also allows for a Miniumim
Payment amount
Accept
Courtesy Credit Payments: allows any courtesy credits on a patron’s
account to be used to pay the fee
Inactive: makes the fee
inactive (for example if the fee is no longer used you would inactivate it
rathr than deleting it.
Once you have added the necessary
fields click [OK].
Editing Fees
To Edit current fee’s, navigate to File>Maintain
Tables>Financial>Fees
Then locate and highlight the fee you wish to edit and click
the [Edit] button.
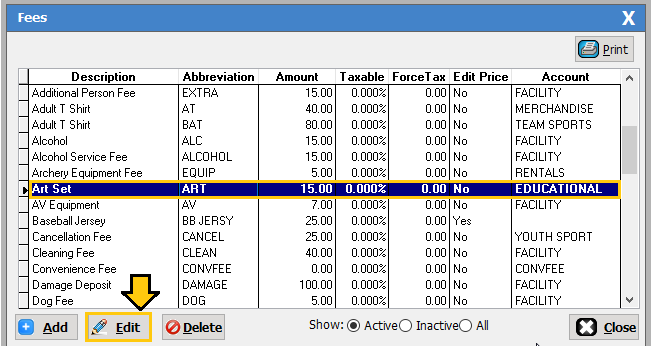
This will allow you to edit everything but the
abbreviation, if you need a different abbreviation you will need to add a new
fee. You cannot delete a fee that already exists because it may have a
transaction associated with it. If you do not wish to see the fee you can mark
it as inactive, as stated in the Add fee section of this document.
SM:GS:TBL:APRIL21