Table: Creating Multi-Purchase Discounts
These
instructions cover the options associated with giving multiple discounts and
how to attach them to merchandise within Sportsman SQL. If at any time you find
yourself in need of additional support, please contact our Technical
Consultants at support@peakinfo.com or 801-572-3570 x2.
This document will go over:
ü Multiple Discounts
ü Adding Discounts to Merchandise
Multiple Discounts
To begin,
navigate to file > Maintain Tables > Financial > Discounts.
The Discount
types screen will populate as shown below. To add a new discount simply click
the [Add] button in the bottom left.

First you
need to give your discount a name and abbreviation. For our example we are
going to create a discount for coaches.

Once you
have given it a name you need to tie it to a GL account. If the GL account is
not listed then you will need to click on the [+] button and add the GL
account before you continue on with creating the discount.
In this
example we’re going to make a discount that allows you to sell one item for
full price, then if multiple items are sold, a discount of a price or fixed
percentage will be applied to the additional items.
First select
the ‘Multi-Purch Discount’ type.
Next, click
the ‘Apply as’ drop-down box. You
will have the option of Editable, Fixed Percentage and Fixed Amount. We are
going to select ‘Fixed Percentage’ in this example.
The first
item that will appear is a +2. This
means that if 2 of the items in question are sold, the 2nd one and
any others will have a discount. Type 10.00 in the yellow field next to the +2
to create a 10% off discount on 2+ items.
Next, check
the box that says ‘Must be in same sale to qualify’ to activate the
discount. Then, select either ‘1st purchase can be anyone in
family’ or ‘Discount only applies to individual’s purchases’ you
must select one of these options.
Now, click [OK],
then click [CLOSE] to save.
Adding Discounts to
Merchandise
Once you
have added a multi-discount, you may want to add the discount to a specific
merchandise item. Below will outline how to set up merchandise discounts.
First,
navigate to File > Maintain Tables > Cash Register > Merchandise.
The
merchandise screen will populate. Simply highlight the item you would like to
apply with the discount, then click [Edit]. As seen in this example, we have some
balloons that we are going to add a 10% discount to.
Click the [Discount]
tab.
Then click [Add]. You will see the following screen:
Pick the
discount you want to attach to the merchandise. If you created a new discount,
it will now show-up in this list. For our example we are going to select the
discount 1 as seen in the screen shot below.
Notice that
when you pick the discount, the screen has now changed as seen here. What you’re now looking at is A TEMPLATE of
the discount you created earlier. In
this example, we are simply going to leave it the way it is. However, you may make modifications to it at
this time to reflect other discounts such as, bigger discounts the more you
buy. If you make changes here, this discount TEMPLATE remains in effect for THIS
PIECE OF MERCHANDISE ONLY. Your original
discount TEMPLATE is still a selectable option as it was originally created for
you to modify as needed for other items. If the discount is only for qualified individuals,
then you will need to make sure you mark that under the ‘Discount Will Be Applied to Section’. Otherwise, you will need to select a date
that the discount goes into effect.

Once you
have selected the discount click [OK] to save.
Then [CLOSE].
Now, you
will want to test it to make sure it is pulling up your discounts correctly. Go
to your cash register screen and add your merchandise to it. Then, click [Edit].
In the
quantity field change it to, say, 5.
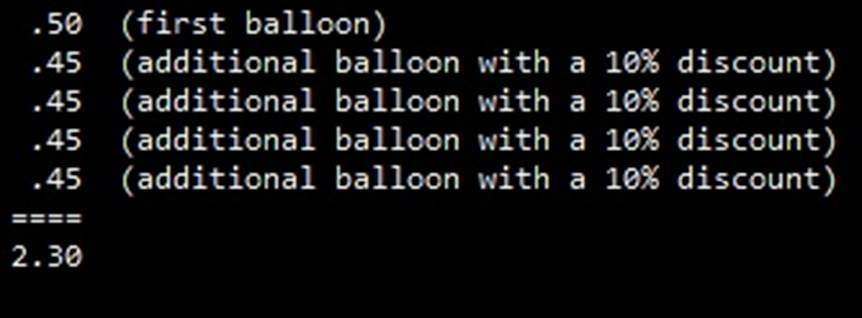
Once you’ve changed the quantity, the discount (if hooked to the
merchandise) will automatically change for you. This means that the first
balloon is 50 cents and the other four have a discount of 10% for each of them.


10% of 50
cents is 5 cents.
Click [OK].
You will notice
now the cash register screen is now ready to check out with the proper total of
$2.30.
SM:CR/POS:M:July21