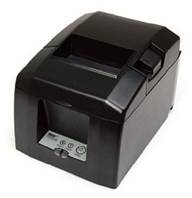
SportsMan Instructional – Star TSP
600 Series Thermal Printer Installation
These instructions cover the Star TSP 600 Series Thermal
Printer installation & configuration.
The first section is for basic setup, the 2nd section is for
more advanced configuration and sharing options.
Road Map
·
Standard
Setup for Windows® 8, 9 & 10
·
Setup for
Windows® 7
·
Advanced
Configuration & Sharing Options
BASIC SETUP
(Stand-alone printer with onboard com port present)
To set up a Star TSP 600 Series printer for use in sportsman
is very simple.
NOTE: NO DRIVERS ARE
REQUIRED TO USE THE STAR TSP 600 SERIES PRINTERS WITH SPORTSMAN SQL IN A
STAND-ALONE / SINGLE COMPUTER SETUP.
First, make sure the thermal paper is in the printer. Next, plug the printer into an available COM
port on your computer. It looks like
this:
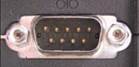
If your computer does not have a communications port as seen
here, a USB to SERIAL adaptor is required.
Most computer stores sell these.
If your printer was purchased from Peak Software you would have been
supplied with an adaptor.
With the computer on and the printer plugged in to a power
outlet, and plugged in to an available COM port, you should have a green light
on the printer. This means it’s ready to
go.
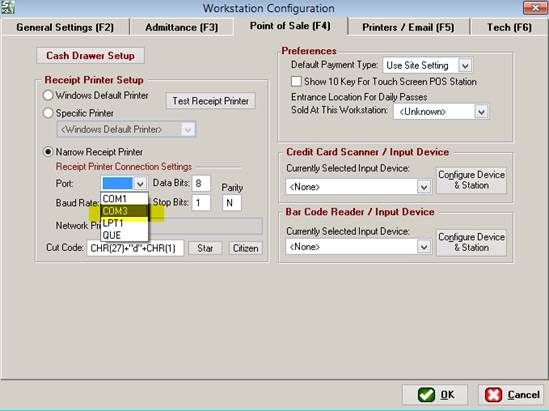
Open SportsMan and go to File > Workstation Configuration, then the Point of Sale Tab as
shown here:
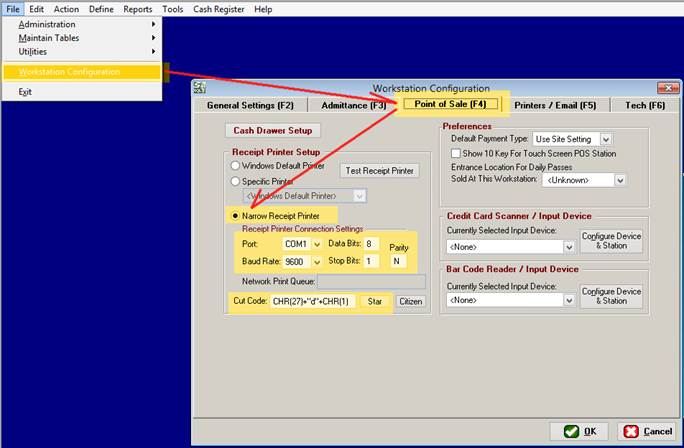
Select NARROW RECEIPT PRINTER, then the COM port that you
plugged the receipt printer into. Leave
everything else the way it is and press the [TEST RECEIPT PRINTER] button.
It should say “receipt printer test.”
If so, you have successfully set up your receipt printer.
BASIC SETUP
(Stand-alone printer WITHOUT onboard com port present)
Setting up the printer without an on-board communications port
is accomplished with the use of an adaptor.
Many establishments sell them but from Peak software your hardware would
have come with one.
Windows 8, 9 and 10 installation:
1.
Plug the
adaptor into an available USB port. Keep
an eye on your task bar and click on it to see the progress.
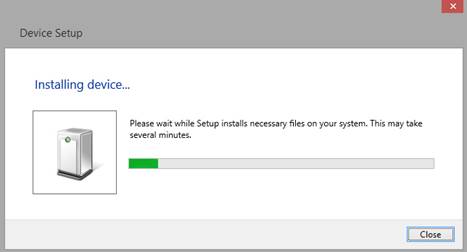
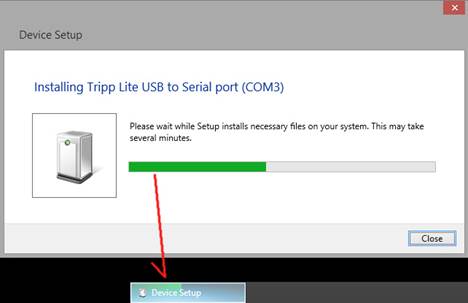
2.
Windows 8
will automatically install the device and assign a COM port. Make a note of it.
With the computer on and the printer plugged in to a power
outlet, and plugged in to your USB TO SERIAL ADAPTOR, you should have a green
light on the printer. This means it’s
ready to go.
Open SportsMan and go to File > Workstation Configuration, then the Point of Sale Tab as
shown here:
NOTE: The
settings are exactly the same as the above instructions except for the
port. In this case, you’ll select the
port assigned to your adaptor by Windows 8.
Select NARROW RECEIPT PRINTER, then the COM port that you
plugged the receipt printer into. Leave
everything else the way it is and press the “TEST RECEIPT PRINTER” button. It should say “receipt printer test.”
If so, you have successfully set up your receipt printer.
WINDOWS 7 Adaptor
installation:
Plug in the adaptor into an available USB port. Keep an eye on the task bar and when it attempts
to install a driver, click the balloon.
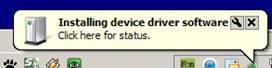
You will see the following:
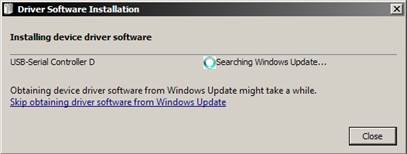
Click SKIP obtaining driver software from Windows
Update. You will see the following:
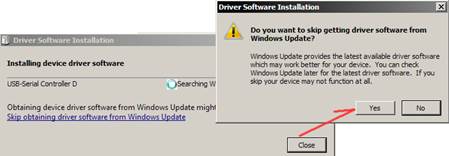
Click YES. You will
then see the following balloon appear in your system tray:

From here, we need to get the driver from the SportsMan sql website. You can
get it from the location shown here:
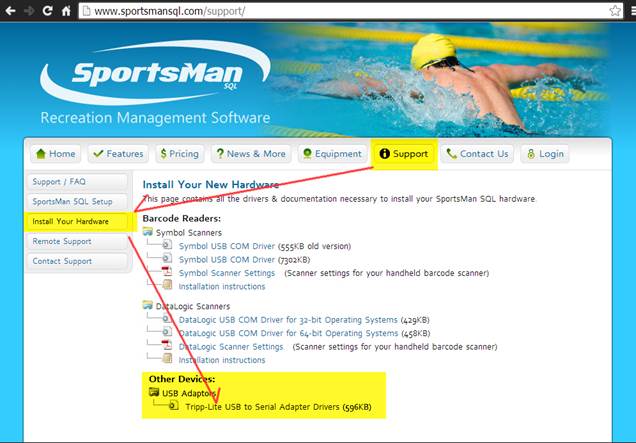
Or you can click this:
http://www.sportsmansql.com/downloads/U209-000-R.zip
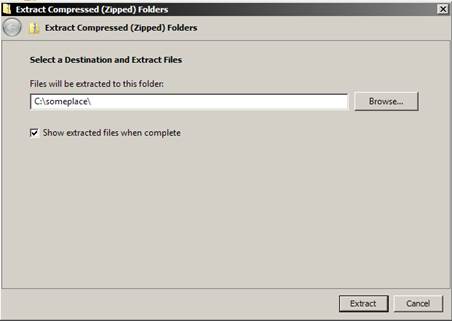
Once you’ve saved the file, locate your downloaded ZIP file
and extract the files by right clicking the file as shown here:

Choose a location to extract your files and click EXTRACT.
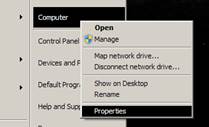
With your files extracted, you will now go to the device
manager on your computer to update the driver correctly. Find “COMPUTER” and right click it. Find Properties and click it.
You will then see the following screen.
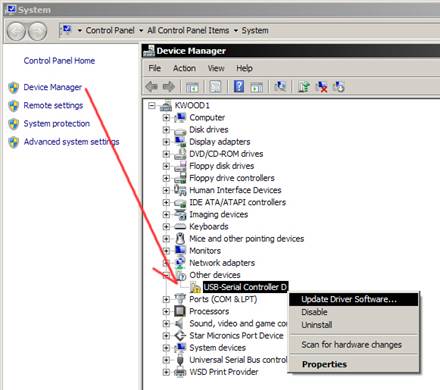
Click DEVICE MANAGER on the left and find the USB-SERIAL
CONTROLLER D.
Right click it and select “update driver software.” You will see the following screen:
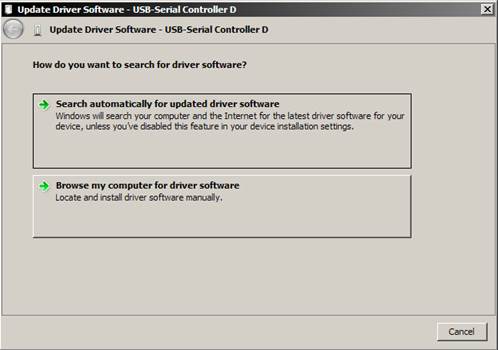
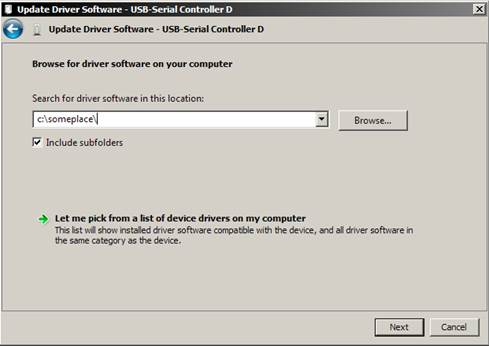
Choose BROWSE MY COMPUTER FOR DRIVER SOFTWARE.
Pick the location you extracted your files to earlier and
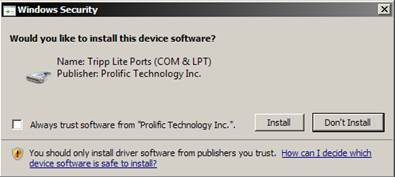
click NEXT
Click INSTALL.
After a minute or two, it will then display the following
screen:
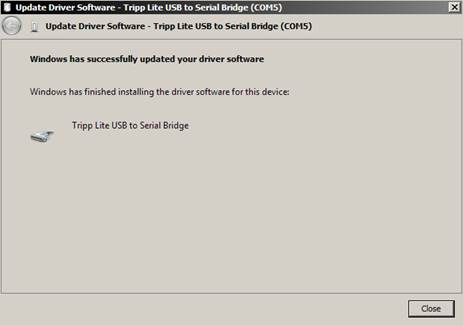
NOTE what COM port it
has assigned.
Click CLOSE.
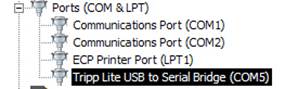
If you missed which com port it assigned, go to your device
manager to see which one it is. It will
show as the following:
From this point, simply return to the top and install the
printer on your new COM port using the basic instructions.
ADVANCED
CONFIGURATION & SHARING OPTIONS
NOTE: If your
computers CANNOT print to remote printers on your network you cannot print from
sportsman.
These instructions cover how to set up your receipt printer
and allow other computers (typically point of sale/front desk) to print
receipts.
Following the basic steps, we’ll assume your printer is
configured and functional on the computer it’s attached to. There are only a few simple steps to get
other computers to print to it through sportsman.
First, you need to share the printer. To do this, you need to install a printer
within windows using the driver GENERIC / TEXT ONLY. Even though it was not installed within windows
earlier, this step is required to share it.
NOTE: Do not change the sportsman configuration on
the computer which has the printer physically attached to it. It will continue to function as intended. We only need to share it for other computers
to be able to use it.
On the HOST computer: (the host is the computer with the printer
physically attached to it)
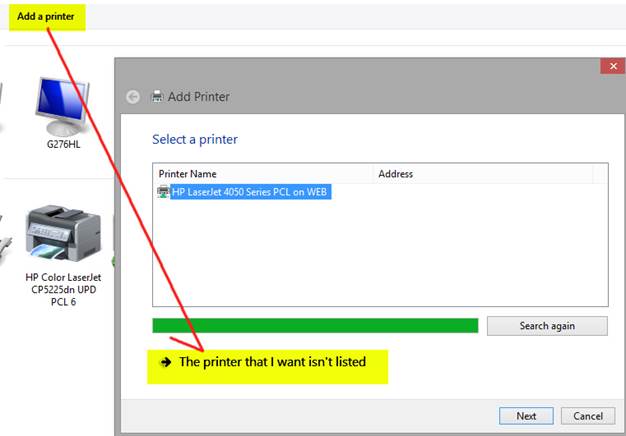
Go to the control panel and find DEVICES and PRINTERS. Click ADD PRINTER, then choose “the printer I
want isn’t listed”
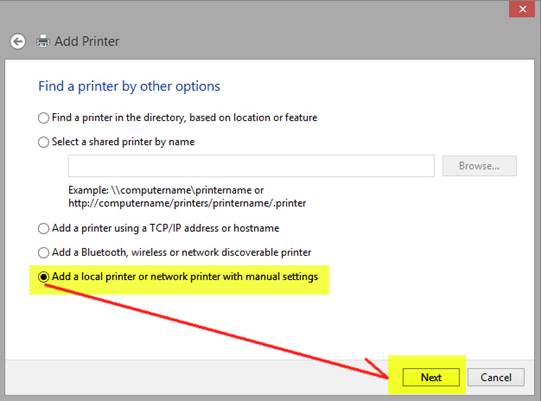
Next, choose “Add a local printer or network printer with
manual settings,” then click next.
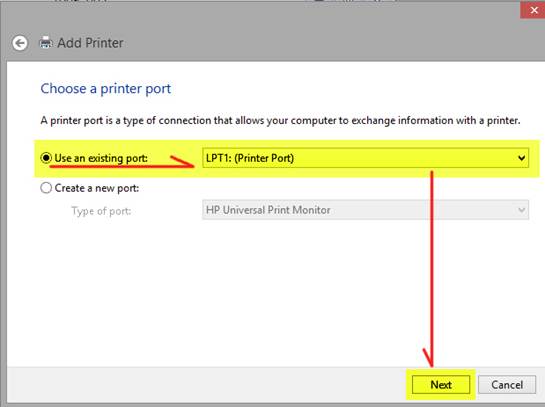
Next, we’ll choose an existing port and select it in the
drop down box. In this case, it will be
the port used earlier (e.g. COM2, etc)
Then click NEXT.
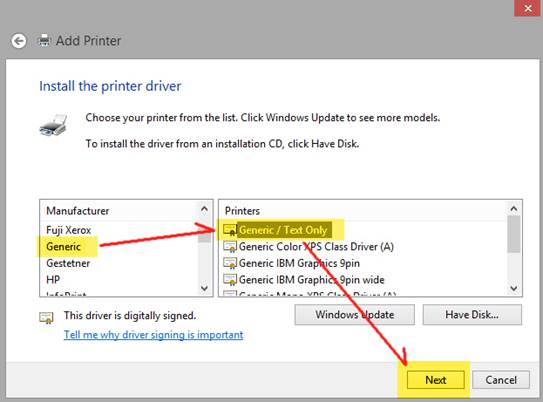
Next, we’ll pick GENERIC, then GENERIC TEXT ONLY on the
right, then click NEXT:
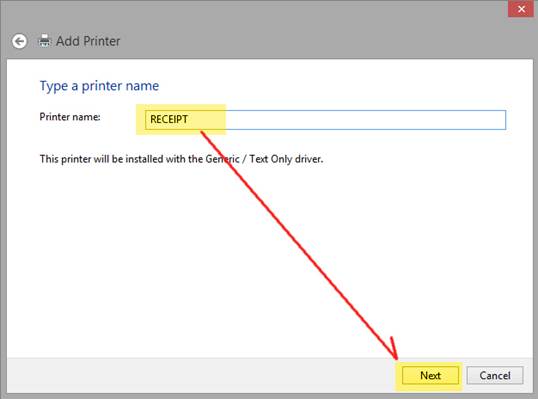
Next, we’ll type a name for the printer. Remember to keep this name simple because
you’ll be using it later for the remote computers to print to. Click next after you’ve typed a name.
It will then install the printer and you will see the
following:

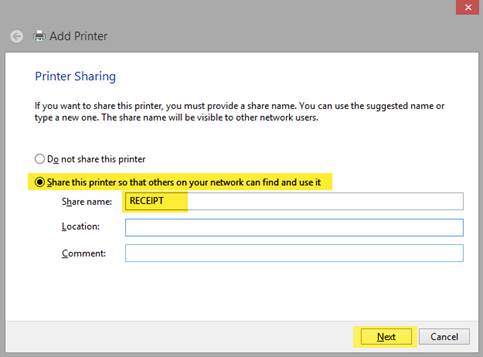
Next, you will see the following screen. You need to share the printer on the network,
then make sure it has a name. By default it will use the name you typed
earlier. Click next when done here.
The last screen here will show the following:
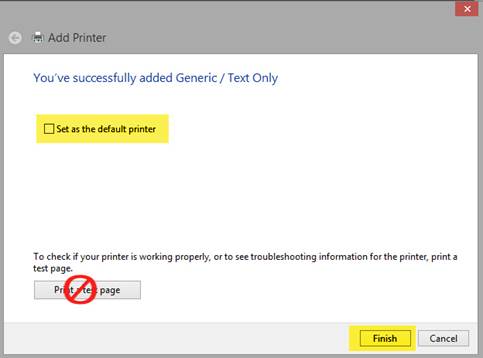
Uncheck the option to set as default then simply click
finish. You do not need to print a test
page at this time.
The Last step is to find the computer name which shares this
printer. To do this, find COMPUTER and
right click it. Select properties.
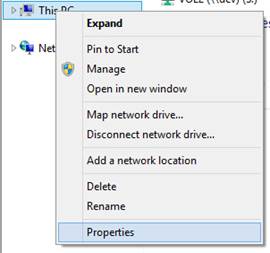
On the computer properties screen, locate “COMPUTER NAME”
and make a note of it. Seen here, the
computer that is sharing this printer is called “FRONTDESK1”
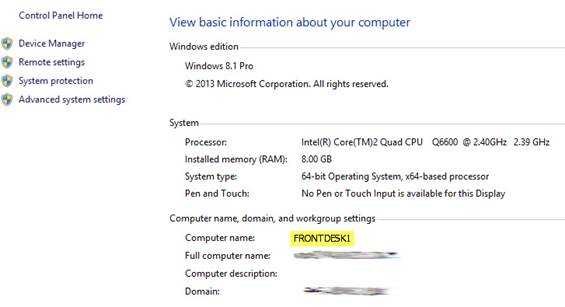
Close the properties window.
We now have the information necessary to have other computers printing
to your new shared printer.
The computer sharing it is called FRONTDESK1 and the shared
printer is called RECEIPT.
It will look like this when used: \\FRONTDESK1\RECEIPT\ Make
a note of it.
Now let’s go to another computer. It’s time to make it print to this printer.
Go to FILE > WORKSTATION CONFIGURATION and the POINT OF
SALE TAB:
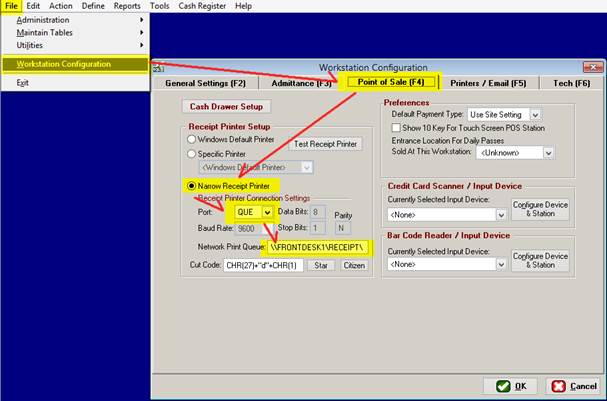
Choose “Narrow receipt printer, then tell it QUE, then put in the location of the receipt printer. In this case, it will be \\FRONTDESK1\RECEIPT\
Once that is there, click TEST RECEIPT PRINTER. It should print a receipt printer test.