Registering a Patron for an Activity
Sportsman users can register a patron for an
activity and take their payment either in person or over the phone. The activity,
program, league, class or timeslot must already be defined (set-up) in your activity
hierarchy. Patrons can also make their
own registrations on your ActivityReg website (if activities are configured for
online registration). Using the Card on
File feature with Sportsman will make it easier to help you patrons with their
transactions. This document will give
you examples of screens from both the Sportsman Desktop application and
Sportsman Web.
Prerequisites: Make sure you have the Sportsman user
permissions to create reservations.
Other Resources: Defining
Activities – General ; Understanding
Registration Methods; Credit
Card on File Setup and Usage
This
document cover:
ü Registering a Patron for an Activity
o
Option 1 Start
by Selecting an Activity
o
Option 2 Start
by Selecting a Patron Account
o
Common Steps to
Complete Registration
There are two approaches to select both a
patron and a program for registration.
Once either initial path is followed you will complete the registration details
and then collect payment in the Sportsman Cash Register.
1.
You can start by selecting the Activity to
register for and then select the patron account.
2.
Alternatively you can begin with the patron
account and then select the activity to register for. This is the same method you can use if you
begin with an empty cash register and select an [Activity Registration] related button.
Option
1 Start by Selecting an Activity
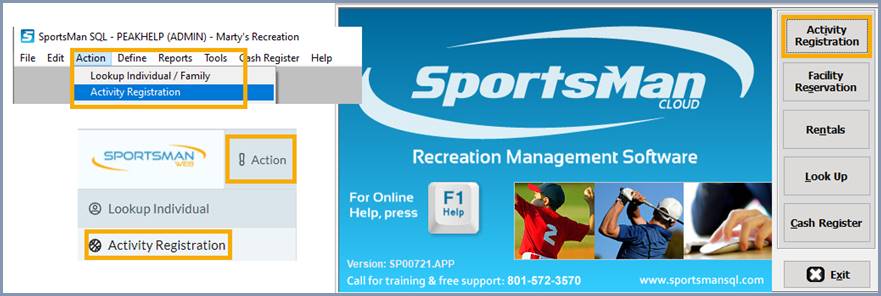
To begin, click on the [ActivityRegistration]
button on the main screen of the Sportsman desktop application as shown below. You can also choose Action>ActivityRegistration
from the top menu bar of the Desktop application or Sportsman Web.
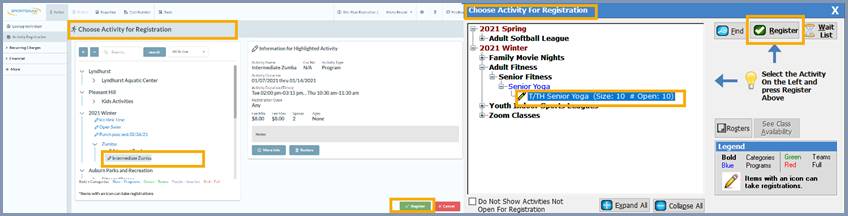
The ‘Choose
Activity for Registration’ screen will appear.
Next highlight the program or class
the patron is interested in. Note that
you may have to expand the program listing to get to the specific class level
using the [+] icon. Then select the [Register] button.

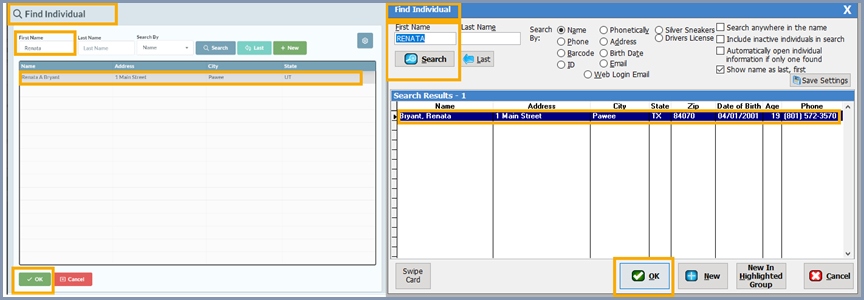
From the ‘Find Individual’ screen look up the patron by name or other search field.
Next, highlight their name from the list that populates then select [OK].

From here, continue to the Common Steps below.
Option
2: Start by Selecting a Patron Account
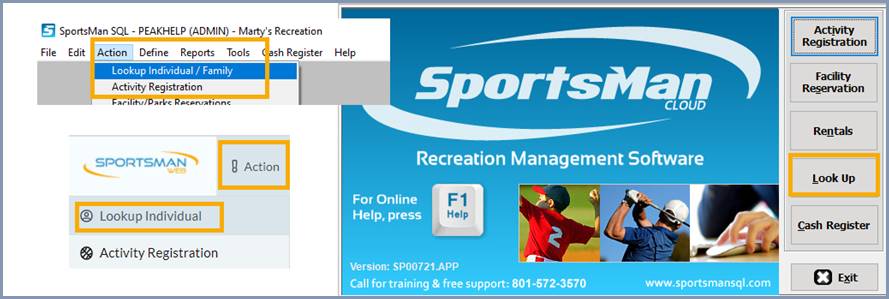
To begin, click on the [LookUp] button on
the main screen of the Sportsman desktop application as shown below. You can also choose Action>LookUp
Individual/Family from the top menu bar of the Desktop
application or Sportsman Web.
From the ‘Find Individual’ screen look up the
patron by name or other search field, highlight their name from the list that
populates then select [OK].
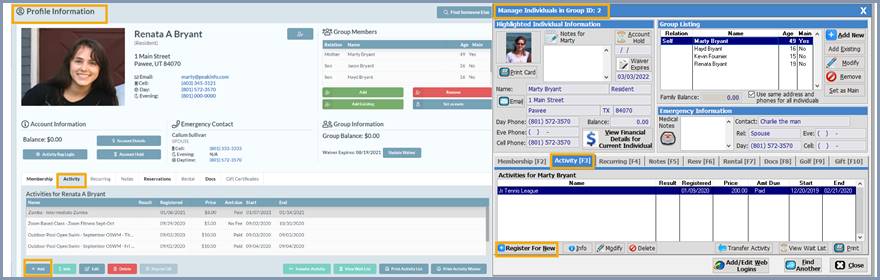
From the Profile Information page
select the ‘Activity’ tab and then
the [+Add] button if in Sportsman
Web or the [Register for New]
button if on the desktop application to add a new registration for this patron.
The ‘Choose
Activity for Registration’ screen will appear. Next highlight the program or class the
patron is interested in. Note that you
may have to expand the program listing to get to the specific class level using
the [+] icon. Then select the [Register] button.
From here, continue to the Common Steps below.
Common Steps
to Complete Registration
The following steps are common to both Option
1 and Option 2.
Once you have both the Activity and the Patron
for registration selected and click [OK]
from the steps above, you will complete the process in the ‘Activity Registration’
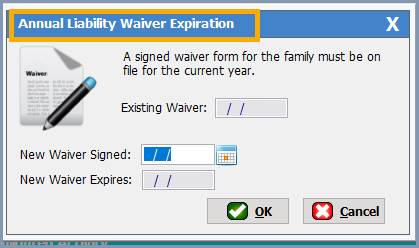
screen and the Cash Register. At first,
you may see a Liability Waiver popup if your center is using annual
waivers. Complete this information and
any associated forms as directed by your Sportsman supervisor.
Depending on the type of Registration Method
that was used the ‘Activity Registration for…’
window may vary. Across all registration
types there may be registration options, required questions to complete, an
opportunity to leave notes, and a common check-out process. The following
example is based on the Program type Registration Method.
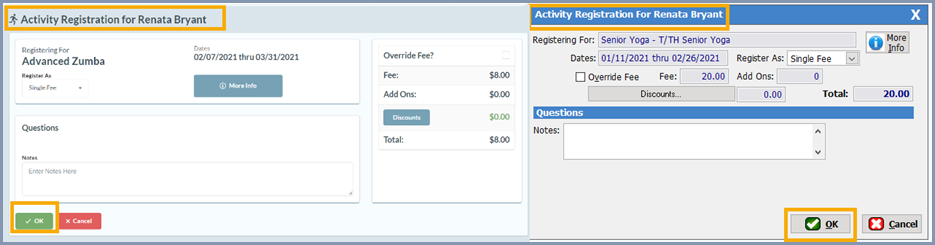
After completing the required and any optional
fields click [OK] to bring up a ‘Sportsman Decision’ box asking whether you
are ready to move the registration to the cash register. If you are choose [Yes], if you want to add
other registrations and return to the program hierarchy, choose [No].
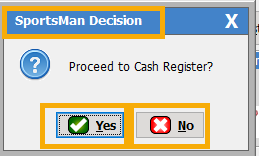
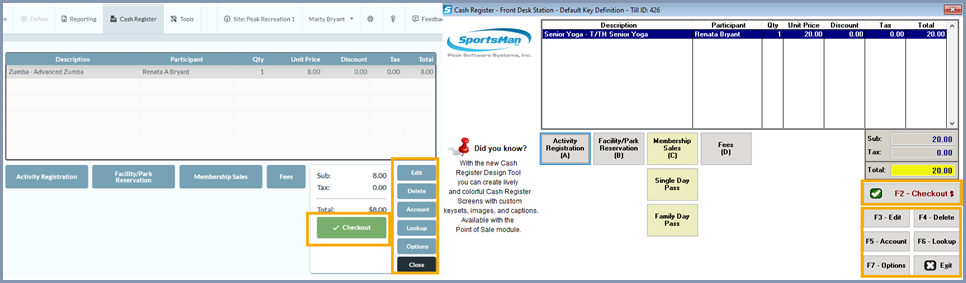
When you eventually choose [Yes] the Sportsman Cash Register
associated with your workstation/computer will open and show the registration,
the participants name, the pricing and any discounts that are associated with
the transaction. From the Cash Register
you can select [Edit] to change
the price if allowed in your permissions, select [Delete] to remove a highlighted registration line from the
cash register, select [Account] or [Lookup] to review the patrons account. You can also select [Options] to see other information such as
other transactions in the current Till, open a dependent cash drawer or other
features.
Please note if you select [Exit], this will close the cash register, however
the line items will remain until the next time you use the register.
When the transaction is ready to be completed with
payment select the [Checkout]
button.
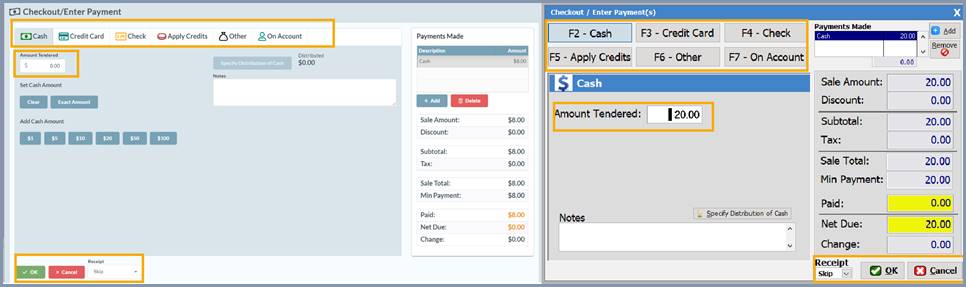
From the payment screen select the type of payment,
whether a receipt should be printed and click [OK]
to complete the sale.
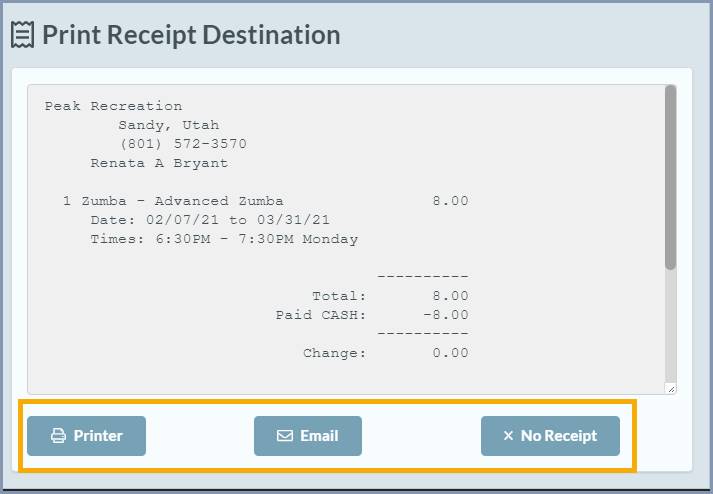
Depending upon your receipt printer settings,
you may see an image of the receipt and can decide to print it, email it or not
send it.
SM:DMA:B:MAR21